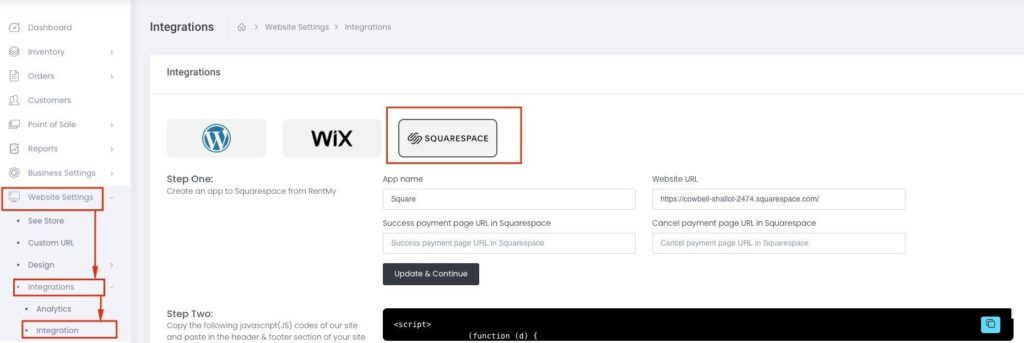
Part B: Paste the code into Squarespace
- Open your Squarespace dashboard in a new tab.
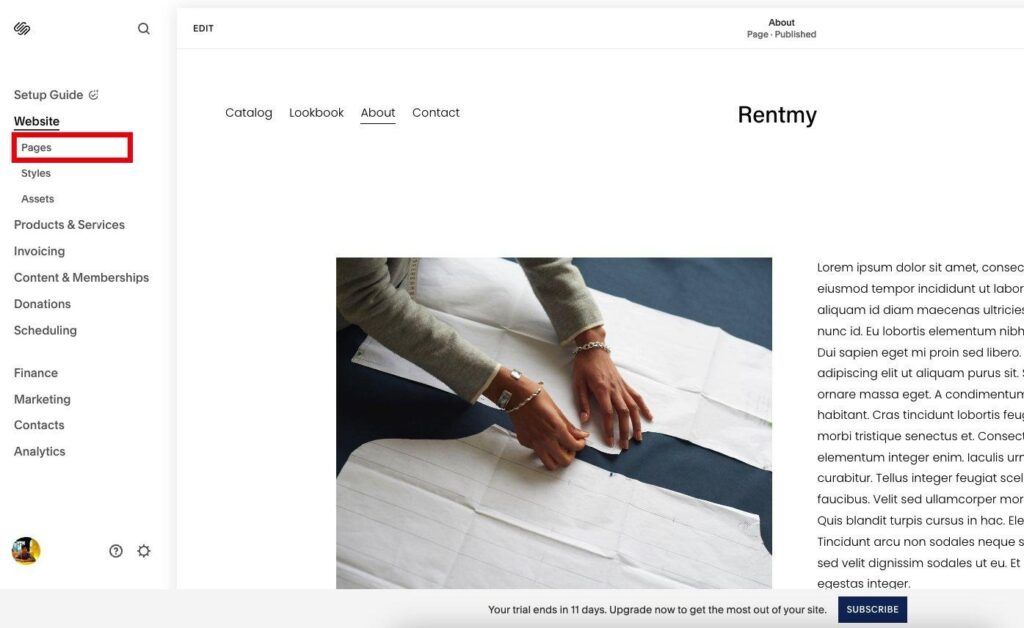
- In the left sidebar, click Website, then click Pages.
Screenshot: Squarespace dashboard — click Website > Pages in the left sidebar
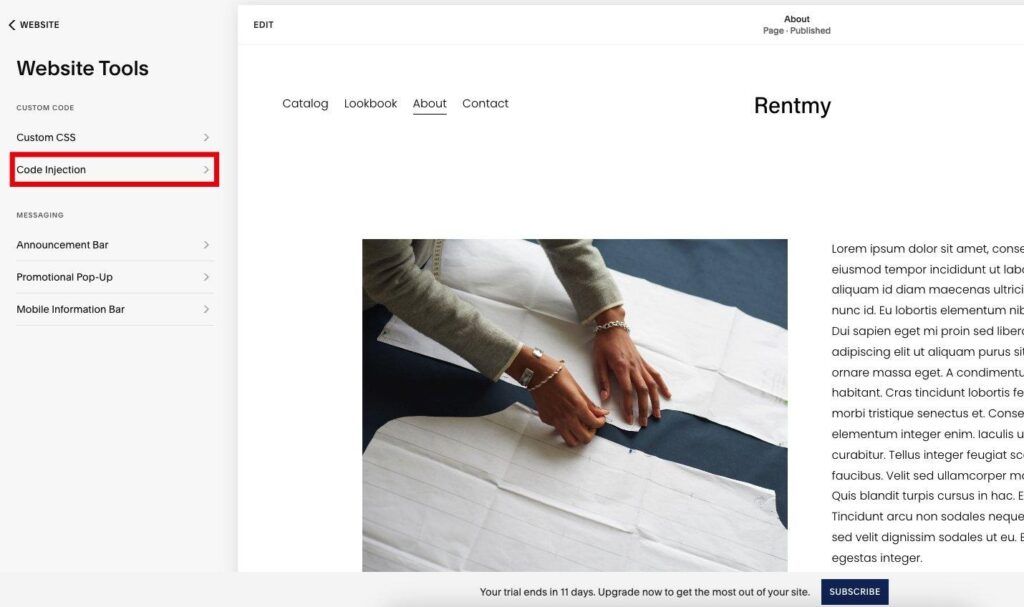
- Scroll to the bottom of the Pages panel. Under Utilities, click Website Tools.
Screenshot: Pages panel — scroll to Utilities and click Website Tools

- Inside Website Tools, click Code Injection.
Screenshot: Website Tools panel — Code Injection option highlighted
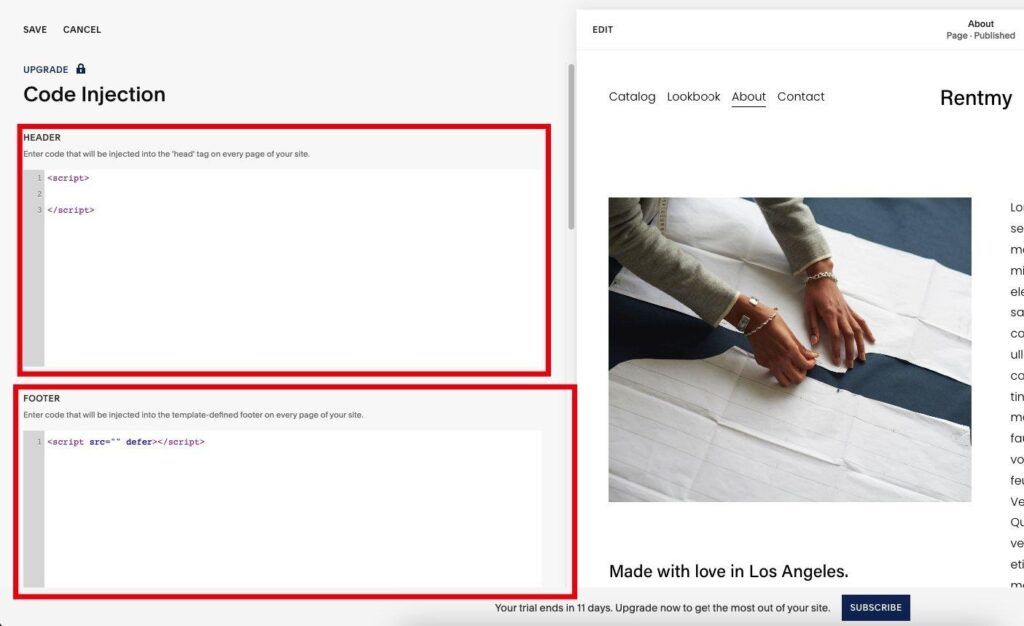
- You will now see two code boxes: Header and Footer.
Screenshot: Code Injection page — Header and Footer code boxes
- Click inside the Header box and paste the code you copied from RentMy.
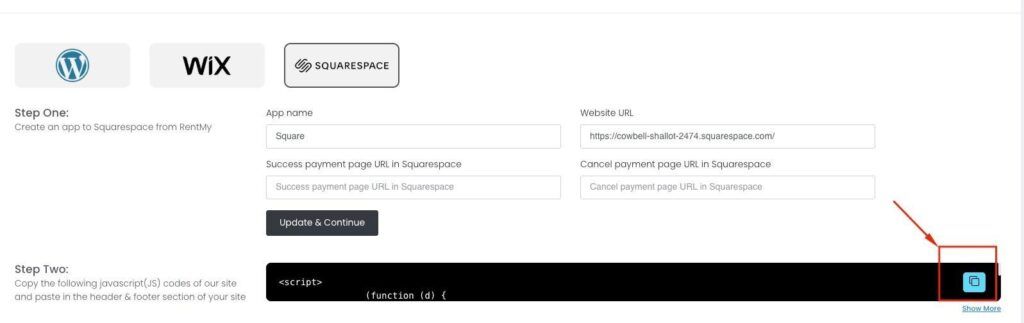
- Go back to RentMy. Below the Step Two code box, you will see a second smaller code snippet (a single
tag with a URL). Click its copy icon. - Return to Squarespace and paste that snippet into the Footer box.
- Click Save in the top-left corner of the Code Injection page.
What you should see
Squarespace will confirm your changes are saved. The code is now active across every page of your site, although nothing visible has changed yet — that comes in Step 3.
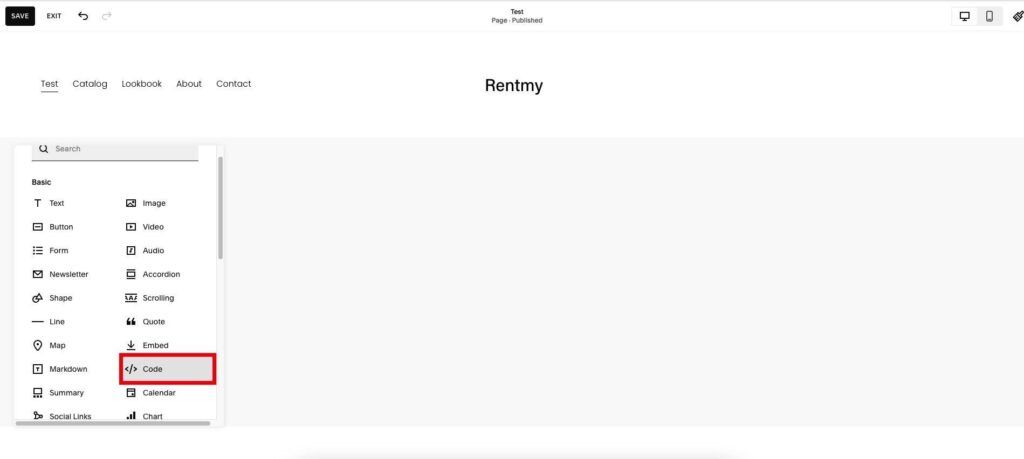
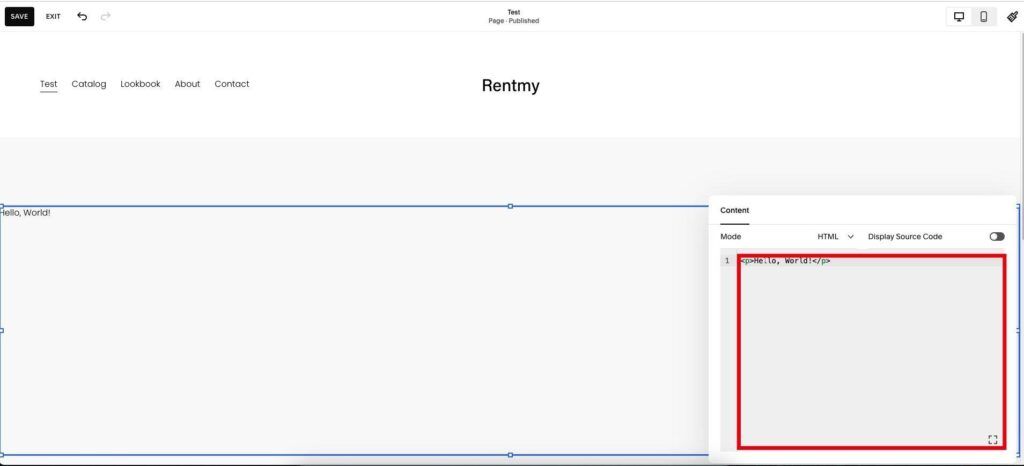
- A Code block will appear on the page, and a panel will open on the right.
- In the panel, make sure Mode is set to HTML.
- Delete any sample content (such as
Hello, World!) from the code area.
Screenshot: Code block editor with Mode set to HTML — clear this area and paste RentMy HTML
- Switch back to RentMy. Scroll to the bottom of the Squarespace integration page to the section called HTML Pages Contents.
- Click the page you want (for example, Catalog) to expand it. Click the copy icon to copy the HTML.
- Return to Squarespace and paste the HTML into the Code block.
- Click Save in the top-left corner of the Squarespace editor.
Repeat steps 2–11 for each remaining RentMy page (Product Details, Cart, Checkout, Order Completed).
What you should see
Once saved, the Code block will render the RentMy page on your live Squarespace site. The first time you load the page, give it a few seconds to fetch your products from RentMy.
⚠️ Common mistake: Make sure each piece of HTML is pasted into the matching Squarespace page. For example, the Cart HTML must go on the Cart page, not the Catalog page. Mixing them up will cause the wrong content to appear.
💡 Tip: You can style the surrounding page (header, footer, fonts, colors) using Squarespace's normal design tools. The RentMy block sits inside your existing design like any other Squarespace block.
Testing Your Integration
Before announcing your new shop, run through a quick test to make sure everything works.
- Open your Squarespace site in a private/incognito window (so you see what real visitors see).
- Visit your Catalog page. You should see your RentMy products listed.
- Click into a product to make sure the Product Details page loads correctly.
- Add an item to the cart and proceed through checkout.
- Complete a test payment (use a small amount or your platform's test mode if available).
- Confirm you are redirected to your Success Payment Page.
- Log in to your RentMy dashboard and check that the new order appears.
If all of the above works, your integration is fully live. 🎉
Troubleshooting
The Catalog page is blank. The header code in Step 2 may not be saved, or the page slug does not match. Re-check your Squarespace Code Injection settings and confirm the slug names.
Customers are not redirected after payment. Double-check the Success and Cancel URLs you entered in Step 1. They must be full URLs starting with https:// and must point to real pages on your Squarespace site.
The RentMy block shows raw HTML instead of products. Make sure the Code block's Mode is set to HTML, not Markdown.
I do not see Code Injection in Squarespace. Your current plan does not support custom code. Upgrade to a paid Squarespace plan that includes Code Injection.
Changes are not showing up on the live site. Try a hard refresh in your browser (Ctrl+F5 on Windows, Cmd+Shift+R on Mac) or open the site in a private window to bypass cached files.
Integration Complete — Next Steps
Congratulations! Your RentMy store is now live on your Squarespace site. Here are a few things you may want to do next:
- Add your site navigation: Link the Catalog and other RentMy pages from your main Squarespace menu so visitors can find them easily.
- Customize the design: Use Squarespace's Styles editor to match the RentMy blocks to your brand fonts and colors.
- Set up email notifications: Configure RentMy to send order confirmations to you and your customers.
- Promote your shop: Share your new Catalog page on social media, email lists, and your homepage.
If you run into any issues that this guide does not cover, please reach out to the RentMy support team — we are happy to help.
RentMy HTML Page Snippets
Ready-to-use HTML snippets for embedding into your Squarespace site
This document contains every ready-to-use HTML snippet RentMy provides for embedding into your Squarespace (or other) site. Each section below corresponds to one page or widget on your storefront.
How to use this document
- Find the page or widget you want to add.
- Click the copy button on the code block.
- Paste the snippet into a Squarespace Code block (HTML mode) on the matching page.
💡 Tip: Always paste into a Squarespace Code block with Mode = HTML. Markdown mode will render the snippet as raw text instead of running it.
⚠️ Important: Each snippet must go on the page whose slug matches the one configured in your header injection code. For example, the Cart snippet belongs on a page with the slug /cart.
Storefront Pages
Catalog with Filters
The full product catalog page, complete with a left sidebar for category browsing, price/quantity/name filters, rent-vs-buy toggle, and a sort-by dropdown. Use this when you want shoppers to be able to refine the product list.
**Suggested page slug: **/catalog
Catalog without Filter
A simpler catalog page that shows the sort-by dropdown and the product grid only — no sidebar filters. Good for stores with a small or curated inventory where filters are not needed.
**Suggested page slug: **/catalog
Customized Catalog
The catalog wrapper accepts a RentMyData attribute that lets you control which products are shown, sort order, pagination, and more. Add any combination of the keys below.
Supported keys
KeyDescriptionExamplelimitNumber of products per pagelimit=10productsSpecific product IDs (comma-separated)products=170720,186414,193913searchSearch query (escape spaces with \s)search=test\sproductcategoryCategory ID to filter bycategory=a311cc3b66c011ea8261...tagsTag IDs (comma-separated)tags=668,4960,164,163sortByField to sort bysortBy=product_name (also rent_price, buy_price)sortSort directionsort=ASC or sort=DESConLoadLoad behavioronLoad=paginate
Example
💡 Tip: Combine multiple keys by separating them with &, for example: RentMyData="limit=10&sortBy=rent_price&sort=ASC".
Product Details
Shown when a customer clicks a product. Displays an image gallery, name, price, rent-vs-buy toggle, recurring pricing, variants, rental date range, delivery options, quantity selector, and the "Add to Cart" button.
**Suggested page slug: **/product-details
Package Details
Same as Product Details, but tailored for package products — items that bundle multiple SKUs together. Includes a "Package includes" section listing the bundled products and their variants, plus a Related Products grid at the bottom.
**Suggested page slug: **/package-details
Package includes
test product buy (2)
Cart
The full cart page: add-on product recommendations, rental date editor, line-item table with quantity controls, coupon input, totals breakdown (subtotal, deposit, shipping, tax, delivery tax), and the "Proceed to Checkout" button.
**Suggested page slug: **/cart
| Product | Unit Price | Quantity | Subtotal | ||
|---|---|---|---|---|---|
| ... | ... | Product1 | $50.00 | ... | $255.00 |
Checkout
The checkout page. Collects billing info, fulfillment selection (pickup / shipping / delivery), order summary, optional services, terms acceptance, signature pad, and the "Place Order" button.
**Suggested page slug: **/checkout
Order Complete
The "thank you" page customers see after a successful payment. Shows quick links to download the receipt, add the rental to their calendar, view full order details, and a summary table.
Suggested page slug: /order-complete (must match your Success Payment Page URL from Step 1 of integration)
Thank You
for your order
Customer Account Pages
These pages power the customer-facing portal: login, signup, profile management, order history, and password tools.
Login
**Suggested page slug: **/login
Registration
**Suggested page slug: **/registration
Customer Profile
Displays the logged-in customer's information and saved addresses. Includes edit forms for both.
**Suggested page slug: **/customer-profile
{{ customer_name }}
{{ customer_email }}{{ customer_company_name }}
{{ customer_phone }}
Reset Password
Standalone page where users can request a password reset by entering their email.
**Suggested page slug: **/reset-password

It happens to all of us.
Enter your email to reset your password
Change Password
For logged-in customers to update their password.
**Suggested page slug: **/customer-change-password
Change Avatar
Lets the logged-in customer upload a profile picture (max 2 MB).
**Suggested page slug: **/customer-change-avatar
Customer Order History
Lists every past order with a link to view its details. Includes a left sidebar menu linking to the other customer-portal pages.
**Suggested page slug: **/customer-order-history

Order History
| Order ID | Address | Quantity | Price | Status | Action |
|---|---|---|---|---|---|
| {{id}} | {{order_address}} | {{total_quantity}} | {{total_price}} | {{status}} |
Customer Order Details
Drill-down view of a single order: summary, billing/shipping addresses, line items, payments table, and a notes section where the customer can attach comments or files.
**Suggested page slug: **/customer-order-details
Widgets & Functions
These are small, reusable snippets you can drop into headers, navigation bars, or any page where you need just one piece of RentMy functionality.
Bottom Mini Cart
A floating mini cart that stays at the bottom of the screen and shows what the customer has added so far. Add it to any page where you want shoppers to see their cart at a glance.
Search Widget
A standalone search bar you can place in your header or anywhere else on the site. RentMy will automatically wire it up to search your catalog.
How to use: Add the attribute rentmy-search-widget to any
Logout Function
Turns any link or button into a "Log out" trigger. RentMy will handle clearing the customer session when it is clicked.
How to use: Add the class rentmy_logout_btn to the element.
Quick Reference Table
Page / WidgetTypeWhere it goesCatalog with FiltersPage/catalogCatalog without FilterPage/catalogCustomized CatalogConfigModifies catalog wrappersProduct DetailsPage/product-detailsPackage DetailsPage/package-detailsCartPage/cartCheckoutPage/checkoutOrder CompletePage/order-completeLoginPage/loginRegistrationPage/registrationReset PasswordPage/reset-passwordCustomer ProfilePage/customer-profileChange PasswordPage/customer-change-passwordChange AvatarPage/customer-change-avatarCustomer Order HistoryPage/customer-order-historyCustomer Order DetailsPage/customer-order-detailsBottom Mini CartWidgetAnywhereSearch WidgetWidgetHeader / anywhereLogout FunctionFunctionAny link or button
Need help? Reach out to the RentMy support team and we'll get you sorted.